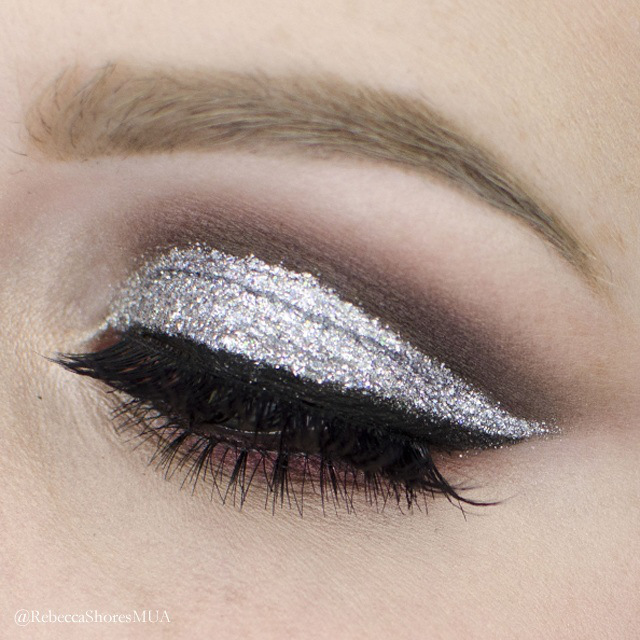
How to Apply a Glitter Cut Crease Tutorial
This look is a bit over-the-top, but it's so fun! I'll show you how to do a cut crease and also make it sparkle. If glitter isn't your thing you can always skip that step. You can also take the technique learned here and change up the colors and finish to your liking, This tutorial is a glitter cut crease eye shadow look with hints of burgundies, which are later echoed through the rest of the face.
Start out by priming your eyes. You'll wanna cover the top lid and just under the lash line for this look. I am using NARS Pro Prime Smudge Proof Base.
Use a base shadow that is matte and close to your skin tone so that blending will be easy later on. I am using Saucebox Snowflake (matte, off white) for this with a Sigma E60.
Next, get a transition shade going from the crease and blending towards to brow. I am using Saucebox Creme Dream (matte, neutral light brown) on a Sigma E40 to blend. We're going to be doing all out blending before we touch the lid and add glitter.
It's up to you if you want to use tape for this step. In the video version of this tutorial I did it freehand, which I prefer. If you have sensitive skin be careful when using tape. I am using medical tape instead of Scotch tape. Make sure to press it onto your arm or clothes once to remove some of the tackiness before adhering to the skin. Line up the tape with the angle of your lower lash line. After you have your tape in place, add some Makeup Geek Last Dance (satin, medium plummy-brown/taupe) along the crease just to get the shape going.
Now grab some Burlesque (metalic, deep burgandy) on a Sigma E32 and pull it just above the crease.
Grab a blending brush and blend that out. From this point on, take care to never touch the edge closest to the crease, we want to leave that sharp, always blending upwards.
Now grab a pencil brush, I'll be using a Sigma E65, and some Saucebox Black Widow (matte, black) Draw a line just above the crease that wings out slightly at the edge. This shape is kind of like drawing wider liner, but on your crease not your lash line.
Now, deepen that line up as much as you'd like.
Use a pencil brush or carefully with a larger blending brush to blend upwards. Again, we want this to be sharp on the bottom.
Now, either add a silver shadow or a liner. I am using Starlooks Topaz liner all over the lid up to the bottom of the black.
If you're not into glitter you can skip this step, but I really like glitter so here goes nothing! Use a brush you don't care about (I use the small side of the Urban Decay Electric palette brush) and apply a thin layer of Violet Voss Violet's Secret Weapon Adhesive all over the silver.
While it's still tacky, start packing the glitter on. I am using Violet Voss Misty glitter (fine, silver with silver/multi-colored reflect) on the larger side of the Urban Decay Electric brush to apply. Make sure you're using a patting motion to apply the glitter so it sticks without going everywhere.
Add some liner. I am using Mac Chromaline to create a wing that lines up with the cut crease. Since it's going over glitter, use short strokes to create the line.
Gently peel off the tape.
Clean off any glitter fall out (makeup wipe or tape should be able to get it off) and do any concealing you need to. I also went over the top of my liner with a black eyeshadow.
Apply SauceBox Creme Dream under the lash line and blend, using a pencil brush for easy application.
Now add Burlesque half way along the lower lash line.
I like to add a touch of black shadow just the the outer quarter, using an angled liner brush for this step.
Since there are a lot of dark colors playing here, add a highlight to the inner corner. I am using Makeup Geek Shimma Shimma (shimmer, ivory). Also tightline and line the water line with black or brown.
Here is the look without lashes, just mascara. This look, since it is dramatic, tends to look better with top lashes.
I added House of Lashes Iconic (top) and Darling (bottom) lashes.
That's the finished look! I hope you try this one out and you can always just use a shadow instead of glitter for a less instence look. If you do try it out #rebeccashoresmua on Instagram so I can see it!
-Rebecca
Products:
Face:
Makeup Forever Primer - 0
NARS Pro Prime Smudge Proof base
Makeup Forever HD foundation – 118
Illamasqua Skin base – white
NARS Transparent Crystal Powder
Nars creamy concealer – Chantilly
NYX Corrector - Fair
ELF Mist & Set
OCC Cream Color Concentrate - John Doe
OCC Concealer - R0
Anastasia Contour Kit
Hourglass Ambient Lighting Powder – Diffused
Hourglass Ambient Lighting Powder – Ethereal
MAC Pro Shaping Powder - Emphasize
Blush: SauceBox - Biscotti, Dramatica
Eyes:
SauceBox Etude Palette -Snow Flake, Cream Dream, Toffee
Makeup Geek - Last Dance, Burlesque
Violet Voss Secret Weapon Adhesive
Violet Voss Misty Glitter
Mac Chromaline in Black
NARS Larger Than Life Liner – Via Veneto
L’Oreal Voluminous mascara- Carbon Black
Mac Extended Play Gigablack Lash Mascara
Anastasia Clear Brow Gel Anastasia
Dip Brow in Taupe & Medium Brown
Lips: Mac Sin + clear gloss
Lashes: House of Lashes Iconic and Darling


