This is a really pretty, but super easy look that's perfect for the changing of the seasons. It's a rounded cranberry eye, which you can pair with berry or nude lips. (Check out my video to see the nude lips with this look.)


How to Apply an Easy Cranberry Eyeshadow Tutorial
I've already primed my lids with NARS Pro Prime, but use whatever primer you like best. Then add a base shadow from the crease to the brow bone. I am using a Sigma 60 for this step with Mac Blanc Type (matte, creme).

Using a Sigma E44 and Makeup Geek Barcelona Beach (matte, medium sand), apply the shadow to the crease and blend upwards towards to brow.

Now apply Makeup Geek Bitten (matte deep maroon) to the corners of the lid and the crease. I use a Sigma E45 for this step.

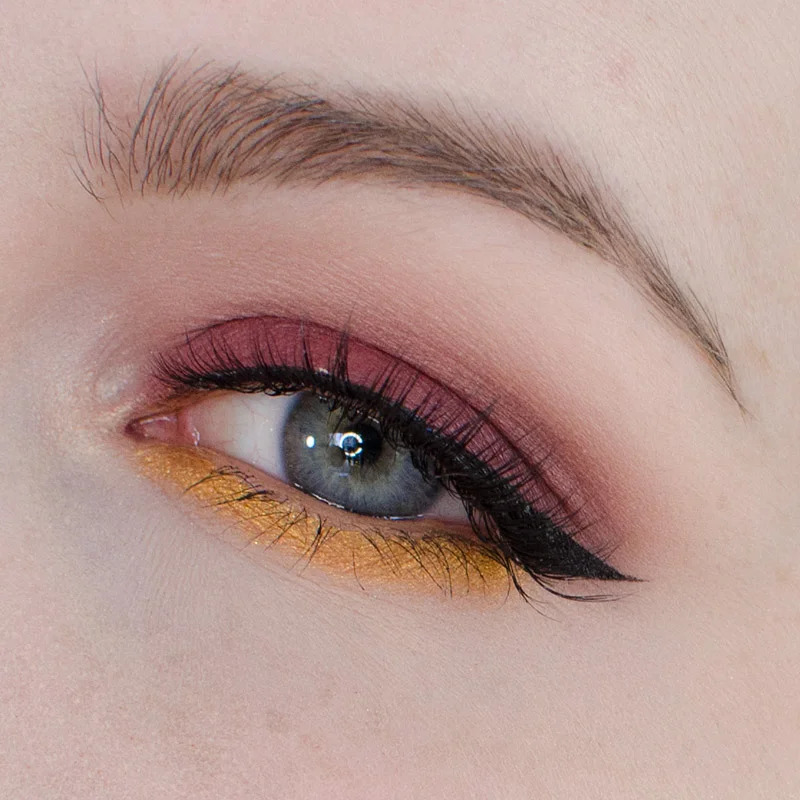
This is what it should look like with the eye open. Btw, let me know if you prefer photos of eyes open or closed or both. I think with my eye shape it's easier to see where things are placed when my eye is open vs. looking down.

Use a clean blending brush and blend all the edges. I am using a Mac 217.

Apply Makeup Geek Burlesque (metallic burgundy) to the center of the lid. I used a Mac 242 for this, but a clean finger would work great, too.

Apply some Makeup Geek Barcelona Beach to the lower lash line. I am using a Sigma E44 for this.

Closer to the lash line, apply Makeup Geek Bitten. I am using a pencil brush for this step.

Now add a touch of Makeup Geek Burlesque to the lower lash line as well. A pencil brush will work well for this step.

Time for a highlight! I am using Makeup Geek Shimma Shimma (shimmer, warm off white) in the inner corner. I use a Mac 239 for this step. Go ahead & highlight your brow bone while you're at it. I use Mac Mylar for the brow highlight.

To add a touch more definition to the lash line, tightline with black and "line" your eyes with a black shadow. I used Mac Carbon (matte, black) on a Sephora Angled Liner brush. I also added a nude liner to the waterline to open up the eye more.

Finish the look off with some mascara and add falsies, if you'd like. I paired this look with a berry lip (Mac Rebel) and a warm blush (Mac Warm Soul). I hope you enjoyed this look. Let me know if there are any specific looks or tutorials you'd like to see!

Products:
Face:
Makeup Forever Primer – 0
NARS Pro Prime Smudge Proof base
Makeup Forever HD foundation – 118
Illamasqua Skin base – white
NARS Transparent Crystal Powder
Nars creamy concealer – Chantilly
NYX Corrector – Fair
ELF Mist & Set
OCC Cream Color Concentrate – John Doe
Anastasia Contour Kit
Hourglass Ambient Lighting Powder – Diffused
Hourglass Ambient Lighting Powder – Ethereal
MAC Pro Shaping Powder – Emphasize
Blush: Mac Warm Soul
Eyes:
Mac – Blanc Type, Mylar
Makeup Geek - Bitten, Shimma Shimma, Burlesque
---You can get makeup geek shadows on their website** (this is an affiliate link, if you don't feel comfortable with that you can go directly to their site makeupgeek.com).
Mac Chromaline in Black
Mac Chromaline in NC20/NW15
L’Oreal Voluminous mascara-Carbon Black
Mac Extended Play Gigablack Lash Mascara
Anastasia Clear Brow Gel Anastasia
Dip Brow in Taupe & Medium Brown
Lips: YSL No 10 and then Mac Rebel over Sephora Collection Nano Liner in Plumb
Lashes: Elegant Lashes 415